Translate

Friday, December 25, 2015

Merry Christmas!

Merry Christmas and Happy Holidays to everyone!

I've been pouting lately and I apologize.
We are moving across Canada soon and this has caused a stall in my creativity.
I will be back in 2016, more grateful for what I have and who I know.
Meanwhile I will show you my mom's Christmas cards that I created for her this year...


She wanted something more elegant this year and helped me choose the design.
My friend Tesa at R&R Scrapbooking created the original card and we tweeked it for mom's taste and ease of mailing. 
Here's the formula:
  • The die is a 6x6 die and I will have to look up where I got it!
  • I cut shimmer white cardstock to 5 3/4x 4 1/4" and die cut it on one side of the die and the other to give slightly different scenes.
  • Matted this on top of the same size paper cut from Bo Bunny's Snow Print
  • Matted this on a piece of 6 1/2x 4 3/4" silver cardstock.  Yep, that's two shades of silver there too, to give more variety
  • Finally it is all placed on a white 6.5x5" card
Repeat 40 times and you've got cards ready to mail!

Hugs and happiness to you all!
See you in 2016!
Cindy

Thursday, October 29, 2015

Last two tags!

Hi!
Thanks to all who are looking at these posts!
I had fun creating these tags for my girlfriend Judith for her birthday this past July and I hope you've enjoyed seeing how I created them. 
November and December needed to be created custom as these months have come up yet as part of the tag swap I am a part of at a local stamp store.

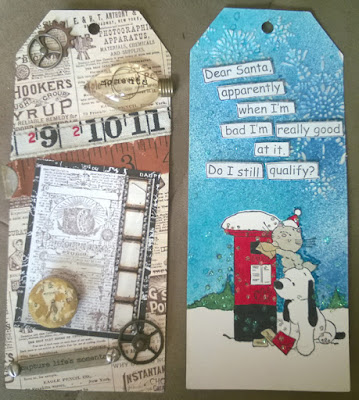
We both like Tim Holtz and the Steampunk style so I attempted this look for November:
A Hancock Park Prima tag was used as the base. I then stamped the Cornish Heritage Farms 6x6 Newspaper Ads background with Stampin' Up Basic Brown ink.

I gathered all the steampunk stuff I've been hording and started with  an old watch part glued down on Tim Holtz Components Camera Collage and then accented with Tim's Ideaology Film Strip Ribbon.

This bulb from Prima Junkyard Findings was glues down on the top right.

Add in a couple gears, word band and Ruler tape from Tim Holtz...

And finish it off with a piece of vintage sewing measuring tape!

December's tag was not photo documented.  Sorry!
  • I stamped this adorable image from Crafter's Companion on the tags and also on a large sticky note to create a mask.
  • Lindy's Stamp Gang Caribbean Blue was sprayed to make the sky once the image was masked
  • I ran the tag through a snowflake embossing folder then sanded the raised edges a bit to make them more visible
  • The image was coloured in using regular markers and accented by stickles for the snowflakes
  • The quote is from Ranger Dylusions Christmas Words (DMR35831) stamped out and individually cut out then pop dotted to give more dimension.
Now maybe YOU can go and make something similar for a nice Christmas/Hanukka gift or stocking stuffer?
Hugs!

Sunday, October 25, 2015

September and October Tags

Almost there!

The September tag I sent Judith was the swap tag I created for June.  I posted the step by step here.

The October tag was created for Judith's love of butterflies. I am embarrassed to say I hadn't used this stamp before this project and I bought it 10 years ago! 
  • I stamped this image from Heather's Stampers Haven and coloured it in with Wink of Luna and Wink of Stella pens by Tsukineko. 
  • Dollar store adhesive pearls were added along the body of the butterflies. 
  • The quote plaque is an old one from my stash and was sold by Making Memories I think.
Hugs!

Thursday, October 22, 2015

July and August Tags

Hi there!

Half way there now!
Mu girlfriend's birthday is in July and we are both crafty ladies.  I tried this year to make her something for her birthday that might be useful and decorative... a tag a month on a ring she could display.  Here is July and August:
 
I've always like the collage look and decided to do so with the July tag.  I went through all my Canadian themed stamps and played around until I came to this combination:
 
 
I used Stampin' Up Cranberry Crisp to stamp all the images on the background:
 
Then I stamped High Hopes Rubber Stamps Mountie, colored him in with watercolour crayons and fussy cut him out.  Finished off the look with white twill tape I had stamped with StazOn Blazing Red and a maple leaf wheel (I cannot remember the maker)
 
The August tag was also made as part of the monthly tag swap but Judith was it's inspiration.  Paper piecing was the name of the game for this tag :) I stamped the Prima Mermaid doll on several pieces of paper: orange/red for her hair, green washi paper for she shimmery skin, Best Creations Pear Gem Glitter cardstock for her tail. StazOn black ink was used.
 
Once all cut out, I pieced the doll together.  Wink of Luna Gold pen was used to fill in her bra and her hairband.
 
The tag was embossed with a Spellbinders MBossabilities Reversible folder: Sea Beauty then rubbed over with metallic blue, green and silver Gelatos.  The 'seaweed' is Rangers Dylusions doodle parts stamped then sprayed with Tattered Angels Turquoise Blue Glimmer Mist and cut out.
The finishing touch is a Magenta quote stamped on a Vertigo Taffeta sheet by Imagine Crafts.
 
Whew!  This was a long one!  Hope I didn't lose you!
Hugs!


Sunday, October 18, 2015

May and June Tags

Nín hǎo!

In recognising my fellow oriental stamp artists on OSA, translation is Hello!
Here's the next two tags for your enjoyment!

May was part of the tag sap at the local store:
  • I used the Rose tag from the Hancock Park stack for a background
  • The Magenta May Flowers Irish Blessing (C07.476.L) was stamped on pink scrap paper and cut out using my Spellbinder Labels die.  The larger die from the same set was used for the gray mat.
  • The rest is stickers left over from doing my wedding scrapbook album 21 years ago! They are Heritage Tints Stickers and Borders from Me + My Big Ideas.  (HSR-03 & HBR-03)  I guess they're still classic looking as I still see them from time to time in stores!
June was made JUST for Judith:
  • Just a plain Prima tag was used- cannot remember the stack name
  • I used my different Asian coin stamps all over the background
  • I cut a piece of oriental washi paper as a large mat for my panda image
  • I believe the panda image and happiness kanji are both by Art Neko. 
  • The white parts of the panda were coloured in with a white out pen!
Later!

Thursday, October 15, 2015

More year round tags!


Hi there!

So as promised, here are two more of the tags I sent to my girlfriend for her birthday in July:

All these tags are using the Prima printed tags sold in stacks of about 40.
March:
  • Used an Aquarelle green tag as the base and stamped the tag with the Magenta Clocks Stamp (C95.255.R) in Timber Brown StazOn Ink. 
  • Layered the Crafters Workshop Script stencil on the diagonal and sprayed with Tsukineko Eucalyptus Walnut Ink
  • Cut two of the Cheery Lynn Designs Hearts 'n Gears die and trimmed the hearts off.  One green brad placed through the bottom of the hearts and into the tag held them in place.
  • The greeting in from Heathers Stamping Haven 'I wish for you...' (CHS#193G)
April:
  • Used an Aquarelle yellow tag for the base and punched the bottom with the Martha Stewart Large Flower border punch.
  • The tag was run through my newest toy: Cut N' Boss with its Herringbone embossing folder.
  • I ran a Butterscotch Adirondack pad over the raised portions to emphasise the pattern.
  • The egg is cut using Spellbinders Filigree Egg die
  • The top tag is also by Spellbinders: Fancy Tags
  • 'Happy Easter' is an old stamp by Stampin' Up and the bunny is Harvy Hare by Comotion Rubber Stamps
Enjoy!

Sunday, October 11, 2015

Where is she?

Hello!
One of the annoying things about being creative is that once in a while you lose your mojo, your ambition, your courage... Big changes tend to do that to me and I haven't been motivated much lately.  I finally sat down to checking my Bloglovin account and getting caught up and noticed a few that are no longer posting for various reasons and decided to unfollow them.  Then I realised Hey!  That could be me!  I do love to share and blog and this epiphany was the kick in the pants I needed.  Thank you to the ladies I do follow!

So Here is a project I completed at the end of June for a girlfriend I care for very much.
I have been participating in a tag challenge at a local store this year and some of the tags were sent to my girlfriend as a birthday present.  I created some more to add to them and made a year round hanging decoration...  Here are the January and February tags:
The February tag was described in my post here.
The January tag was truly made just for her...

I started with a spraying ink through a snowflake stencil.  Let dry.
Took a second stencil and used clear embossing paste over top the first pattern. Let dry.
StazOn ink was used to stamp the greeting in the bottom right.
I stamped two copies of the mandala image by Outlines Rubber Stamps in StazOn and accented with silver pen.  I cut off the last three layers off one stamped image then layered the rest at an angle over a whole mandala.  I then took the cut off edges, flipped them and attached to the outside edge to look more snowflake-like. I used pop dots to adhere the centre portion.

I'll be posting more of her tags in the next couple weeks.
Hope you enjoy and hope you still wish to follow me!
Hugs!
Happy Thanksgiving from this Canadian!

Friday, July 31, 2015

Annual Publishing Event

Hi!

One more Oriental project to finish off my birthday month and my reign as Spotlight Artist of the month :) 
Each year at OSA we run a swap called and Annual Publishing Event.  A wonderful organized person takes charge and chooses an theme for the year along with the size.  At the beginning of summer the final numbers are tallied and we are to make that number of pages and two covers and send them to this person.  Just after the new year we all anxiously await delivery of a finished published book. 


This was the book I received for 2014.  Looks yummy doesn't it?  The theme was 'The Year of the Child'.  I covered my front and back covers with washi papers from my collection.
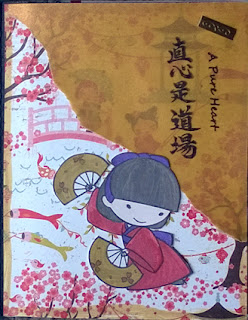
For my page, I started by stamping many copies of the stamp 'Yoshimi' by Sister Stamps and colouring them in with my Wink of Stella and Wink of Luna brush pens by Zig.  They give everything a nice shimmer.  Then I hand cut them out...
The background paper is by Basic Gray called Konnichiwa-Hello Friend.  I edged it with one of the brush pens, then added a torn corner of gold vellum.  The kanji stamp is by Art Neko called A pure Heart.  To hold the gold vellum in place I used the EK Success Fastenater and a gold staple.

Now off to plan for this year's APE- Kites and Flowers!

Monday, July 27, 2015

Underwater fun

Today is my birthday!  Happy Birthday to me!!! (liberties taken with the popular song on the radio)

Today I thought I'd show you a card I made for an exchange at Oriental Stamp Art.
 I used some washi purple paper as the background and stamped this mermaid from Inkadinkado.  I covered it with a same size piece of Vertigo sheet by Imagine.  The layer was wrapped with sheer purple ribbon and held in place by Stickapodomous Stickers. The combnation was matted on another purple cardstock layer and placed on a black card front.  The right edge is punched with a Martha Stewart border punch.
I hope I captured the watery effect in this shot for you.  Cool stuff these Vertigo sheets!
Hugs!


Saturday, July 25, 2015

Show Off Your Paper!

Hello!

At a meeting of our stamp club in April I was reminded of a way to show off our special pretty paper that we all collect or make!  A simple layout that we can make lots in one session.  For those of us at Oriental Stamp Art who collect a lot of Asian Washi paper, this is a wondersul way to share some our stash:) 
 Pick two patterned papers that have a similar colour in them in common.  Separate with band of plain paper or ribbon.  Add a simple greeting or image and you're done!  You can mat the papers like in my crane friendship card or mount them flush to the edge.

I like to use the scraps to decorate the inside to match the front of the card. 
Have fun!
Hugs!

Saturday, July 11, 2015

Cancer Donation + Mojo Monday

Hello All!

I know I promised this to be a month of Oriental cards, but I've finally been able to do something I've been planning for a while now:  Donate my hair to cancer.  We lost my dad AND father-in-law to 2 different cancers in 2009.  I found out this was an option to donation a couple years ago when a friend's son started growing his hair to donate...  This month my hair was the minimum 8 inches long ponytail to donate.  So my sister, a red-seal hairdresser did the honours for me and when sending it along to Pantene... well we must make cards!!!

I did this card using the sketch at Mojo Monday for their Challenge/Contest 405.

I used Best Creation glitter cardstock, black glossy cardstock, cancer print paper by Me & My Big Ideas, pink paper from a gelli plate session, a flower from the Re-Use Centre here in Edmonton, half pearl from Stampin' Up! and a Magenta Stamp called Be-YOU-tiful.


These other cards used various supplies from my stash, a ribbon stamp and various greeting stamps.


I wanted to send 10 cards so I included a card I did last year and recycled a beautiful pink oriental card I received from Bonnie at OSA last year too.  Hey!  I guess there is some oriental!!!
Here is the package ready to go through Canada Post :)  The girl at the counter said I got points for wrapping! :)

Oh yes.... Here are before and after of my hair, if you're interested...

Hugs!

Wednesday, July 1, 2015

July OSA Spotlight Artist

Hi All!

Lots of activity here in the Connell household...
The Oriental Stamp Artists named me the Spotlight Artist for the month of July and I'm thrilled!
OSA is a stamping group on Yahoo Groups and we have multiple challenges, swaps, mingles and share art on an Oriental theme all around the world!  Check us out if you also enjoy oriental art...

So for my project I decided to complete another page spread in one of my art journals:


Started with a set of pages I had already prepped in purple watercolour, some scrap paper and images cut out of advertising.


Then I found some perfect stencils in the Stencils 201 Book.  I used acrylic paint through the stencil to get these pretty blossoms:)


Then my stamps and Adirondak inks were added to continue the flower theme.  All was well until the last impression on the far left...  Arg! Hate edge stamping!


So I took out another stencil, my Inka Gold paste and my trusty finger to cover some of that up and provide some texture.


To finish it off, I stamped this greeting onto vellum and matted it onto some washi paper.  This placed on the gold pattern finished it off. 

Keep checking this month for other oriental projects!
Hugs!

Monday, June 8, 2015

New Tag

Hello!
I've been participating in a monthly tag swap at a local scrapbook store since February.  Each month we get given a theme and the requirement to use the Prima tags.  This month the theme was 'All About Me'.  I like the idea, but get stumped when doing this theme with people I do not know well...
I decided to pick a favourite quote I try to live by and some favourite elements.  After I completed the tags, I thought of a GREAT idea. (figures!)  Anyway, here is my June All About Me tag, step by step:

First I used Prima Hancock Park tags and embossed them using my CutNBoss and it's wood grain embossing folder.  Could do 2 of these large tags in one pass!

StazOn ink was rubbed over the raised embossing and I sprayed the tags with ? spray and used baby wipes to spread the stain... brown fingers for the next 2 days!

This tree stamp is by Magenta and a favourite.  I stamped it and the greeting on textured cream cardstock that has a fuzzy feel to it.  I got it through a group purchase with my stamp club and we dubbed it 'dirty paper' as it feels rather sexy! :)

The leaves on the tree and saying were coloured with my Stampin' Up markers and the texture of the paper helped smooth out the lines quite nicely.  The last thing I did was distress the edges of both saying and tree panels and pop dot adhered them to the tag. 


Hope you like this attempt at showing some of what I am about...

Wednesday, June 3, 2015

Grad Season

Hello again!
Tis' the season for graduation celebrations.
High school, kindergarten, university and even grade 9.
The last one is the focus of this post.
I deliver lunches that have been ordered to kids at their schools.  "Hey it's the Lunch Lady!!!"  Needless to say I get a lot of smiles and occasionally hugs:)  These past 3 years though there's one young lady at a school I deliver to that has amazed me.  Even in Grade 7 she would be unfailingly polite to me each week and went out of her way to let me know why she wasn't ordering the next week.  (Here's where I start to sound old) Most kids do not have respect for adults anymore... I am lucky that my schools are pretty ok, but I have seen and experienced the indifference and even rudeness that seems to be the norm these days.  So this girl stood out!
Back to the card...
So this young lady is finishing her junior high education this June and since my last delivery was last week, I wanted to let her know she was amazing and encourage her to keep aiming high. I made this card for her:
I followed a past Mojo Monday pattern and stuck to the black and white theme.  Papers are mostly from my scrap stash.  I used a shimmer white for the punched border and centre circle.  The mat on the circle is plastic mesh from when we replaced a window screen :)  The alpha strip is fabric tape from Prima, I think.  Last but not least is the greeting, which is from an old Stampin' Up set. 

End of the story: She loved it, thanked me for the card and not and gave me a big hug.  I love hugs!

Tuesday, May 19, 2015

More Peacocks

Hello!

It's spring!
It's warm again!
It's hard to stay inside and stamp when there are growing things to take care of!
I have been starting a new job and also doing some needed prep work in the yard for this year's growing season... Sooooo the blog got neglected.  Sorry about that!

I did play with more of the papers and stamps from the new Heartfelt Creations Peacock Paisley line though and thought I'd show you the results of an afternoon of no deadline fun.  Many of the papers are double sided which only double the fun of creating.

This is close up of a card using a scrap that struck me as looking like an "L".  As some know, I love to look for uses for scraps :)

And as these papers are double sided, the inside can be rather busy so I made an inside panel to be able to leave a sentiment and visible signature.

Hope you enjoy!
Hugs!

St. Patrick's Day and International Quilting Day!

 Woohoo! Time for some green Quilts! LOL! Not often that these two days land on the same weekend. I finally finished one of my UFOs (unfinis...