Translate

Friday, November 25, 2016

More Christmas Cards

Hello!

In the evenings I like to spend time with my husband, and as he enjoys his sports, it's in the livingroom.  So I've started cross stitching small images that can be placed on cards.  In an evening I can finish one image, so I've got a few to sell now.


Remember to come by to Vintage Coop (In Sault Ste. Marie at the bottom of Church Street behind the Floater Plane Museum) tomorrow to see a lot of beautiful items for sale (gift ideas anyone?) and then get a card from to finish off the gift! 


Thursday, November 24, 2016

Christmas Card Frenzy

Hello all!

I've been frantically making cards the last few weeks.  Not our family cards of course, I've still to make THOSE.  I sent off my mom's cards to her last week and I've been finishing off cards to sell at the Church Street Coop this Saturday.  I'll be there all day from 10-4 with my cards and other items I have made.  Come by if you get a chance!  We're located at the start of Church Street behind the Floatplane Museum.

One of the projects I've been working on is helping a friend of mine here in the SOO to do some stamping.  She's quite the artist and even created a series of canvases a few years ago.  I used these images as a starting point for her to stamp on.  She's created quite a few cards and sold a few too!  I've gotten her permission to use her images as a starting point for some of my cards. 


Another person I've been working with is Sandra with Clay It Forward.  I really like the idea of making a piece of art in exchange for a completed piece.  She also uses her donations to help bring attention to other non profit groups. 


So I combined both in a series of really pretty cards if I do say so myself! 


Hope to see you at the Church Street Coop on Saturday!
Hugs!

Friday, November 4, 2016

Christmas Card Chaos

Hello all!

I'm in the middle of Christmas card assembly for my mom's cards and at the end of the days I fins myself thinking of simple cards.  Though, maybe not so simple, as they take an evening to complete....  I'm talking about Zentangle. 

When we first got into the house back in March, I had no access to my craft supplies and started to go stir crazy.  So I went and picked up some pens, tiles, adhesive and card/envelope sets.  I wanted to make some thank you cards for our realtor and others who helped during this process. 


I made a few more, but sent them off before photographing them. 
I'll post more cards this week of the cross stitch cards I've been creating...
Hugs!

Cindy :)

Friday, October 14, 2016

Common Threads

And the days go on and on and on.....
I have reminded myself to post updates for two weeks now and something gets in the way.
No more!
Besides, I'm stoked!  I was woken up early today.  (normally NOT a good thing) However, this phone call was to let me know I have a table at the Algoma Art Council's 'Common Threads' next Saturday, October 22.   I have been creating more fabric themed and ribbon accented cards in preparation and it's gonna be fun!  This is also a presentation forum, so I will be cross stitching more piecing to turn into cards at a later date. 
I use ribbon, yarn and thread on a regular basis to add dimension to my cards.  Here are a few I have been playing with lately.


I'll try to get more posted next week before the show.  Be sure to stop by if you are able!

Sunday, September 18, 2016

Shimmer Time

Hello again!

I've been frantically trying to catch up on projects since we got home from our holidays.  Also been fighting my fibromyalgia symptoms.  So... a little later post than originally thought.

I have a journal/daytimer that has a pretty cover I created a few years ago.  My girlfriend's girls admired it just before we moved and so I had the idea to create them a version of it for school binders. 

The technique uses Shimmer Sheets by Elizabeth Craft Designs.  I was very lucky to be part of a group that learned first hand from her how to use these sheets in our art.  If you ever get a chance to take a class with her, grab it with both hands! (I have no affiliation to her, just LOVE her and her products!)

Anyway, I took a 3x4" piece of 12 different coloured sheets and ran them through different embossing folders.  Some I rubbed StazOn ink across the top to highlight the embossing.  Some I took sandpaper across the top to bring up the design. 
Then I started cutting the pieces and making a patchwork of squares onto an 8.5x11" sheet of paper.
Once the paper was covered, I took decorative sticker borders to create 'stitching' around each of the squares.  I made sure I had enough for two full sheets and therefore two binder covers.  If the binders wear out, they can transfer the art to another window cover binder or if they get tired of the art, they can just remove it!

I still had bits left over and enough to make a birthday card for a friend.  The same technique was used in a smaller format.

And since I like to decorate the inside, a border was made inside.

Have a great week!
Hugs!

Wednesday, August 31, 2016

OSA Card Exchange

Hello everyone!

After a crazy road trip with my mom visiting family in Southern Ontario and Quebec, we are back home.  I can safely say my wandering foot (that I inherited from my dad) has been satisfied... for now :)  Maybe next month I can convince my hubby to drive me somewhere else! Hee Hee!!

I have a lot of catching up to do though. Here and on my swaps...
To start with is an easier one. 
I am part of a monthly exchange that requires the use of oriental themed stamps and a colour restriction.  LOVE these!  the month of August was Black, White and Yellow. Decided to add some stitching to the card too.

Started by stamping the Lotus Blossoms (unknown) on thin white cardboard to be able to withstand the stitching.  I coloured the flowers with SU! ink colours: Yo Yo Yellow, Summer Sun and Summer Starfruit.  I used a poking instrument to make the holes and stitched the centre of the flowers with white, yellow and black thread.  I then cut out the flowers individually.


I embossed some yellow cardstock with a new embossing folder by Darice called Lotus Blossom.

I used the Spellbinders Labels 2 set to cut out a focus piece out of scrap white and black packaging then stamped the Kanji (Digital Princess Designs).  Then it was just a matter of assembling the card!

Hugs!
More later this week!

Friday, July 22, 2016

Draw Results and a Canada Wreath!

Hello!

Well I had quite a few visitors and comments left!  Thank you VERY much! AS far as I know those links for the 2016 Where Bloggers Create will be active for quite a while, so do go back and visit them!  SO much eye candy!  Thanks again to Karen Valentine for hostessing this event! 

Speaking of candy, I promised to draw a name for the Elizabeth Craft Dies and so I have.  I used a random generator to enter all the names of those who commented and it drew...

Team Clark!
Drop me an email with an address and I'll send off this goodie in the post.  Hugs!

Now, for the creative part of this post... I finished this wreath before I got sick and did not get a chance to post it... I am a very proud Canadian and feel there are not as many creative ideas out there like our neighbours the Americans when it comes to holidays.  So as our national holiday Canada Day (July 1) falls just before the Fourth of July, I borrowed one of the lovely ideas and adapted it for us!  I tied 1/2" x 4" torn strips of white and red on a 12" metal wreath, mimicking the Canadian flag then used a dollar store wooden Canada cut out and hung it along with the wreath.  I think it turned out lovely!  Took me all of 2 hours to rip and tie fabric.


Friday, July 15, 2016

Where Blogger Create 2016

Hello, Hello!!!
Thanks for visiting my space today!
Especially since today is Where Bloggers Create 2016! 
Thanks to Karen for hosting this and providing a jump off space for people to go exploring.
The tab on the right side bar will bring you to her site where you can see other great bloggers' spaces. Or you can click HERE.
This is a longer post than usual, so grab a favourite cup of tea and enjoy!

As already mentioned, my husband and I recently moved cross country to Sault Ste. Marie, Ontario from Edmonton, Alberta.  We downsized while we were at it, but Jim made sure to have an area that I could craft in, as I do need my crafting to help keep me sane.  We needed to renovate the area, but he did not hesitate to do so and now I have this wonderful, bright, colourful space!!!
HERE is the first of the renovation posts and HERE is the second.
Welcome!


Like I said, bright and colourful!
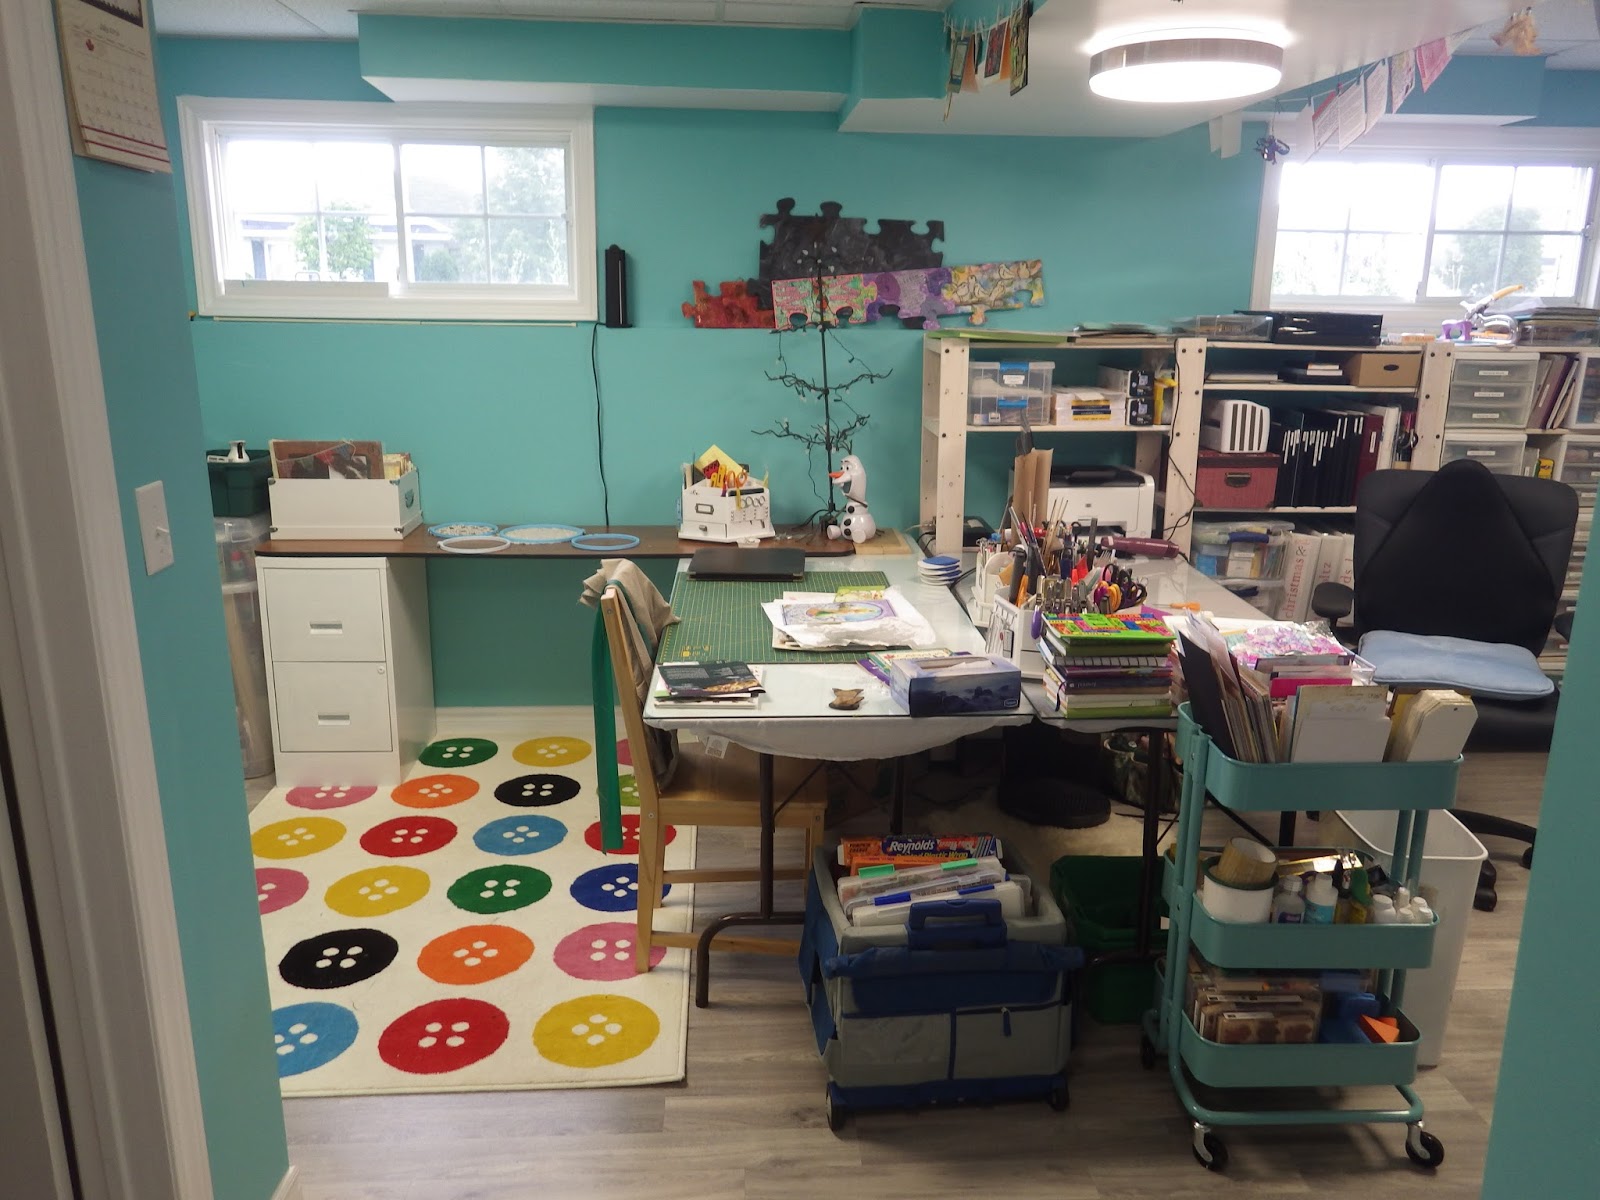
As you come in, look to the left and you will see my sewing area.
The cupboard was going to be painted white, but after I finished with all the shelves, I was DONE with painting large scale items... It will be covered with fabric matching the teal of this room at a future date...  But it is a perfect place to store all the fabric I have collected for various projects.  The carpet I have been loving FOREVER, so I ordered it along with some cabinets we needed for the kitchen, to put in this place.  My sewing machine will go on the narrower table once it is covered like the others. I did paint my green and brown filing cabinets white to go in this room too. My goal is that mostly all of the furniture is white or light to let the walls and art pop!  I took the idea from Pinterest to use the top of one of the cabinets to store my fat quarters and smaller amounts of fabric over file folders.  The bottom drawer has the books and patterns I kept after purging.

The tables we had in Edmonton were great, the right height and so I just covered them with an old white sheet that had seen better days, then a piece of glass.  Jim had already cut one for his 30x72" table in Edmonton, so I had another cut for my 30x60" table here to match.  One will be mainly for sewing and the other is set up for my crafting.  Now if friends come to visit, the sewing table becomes a spacious place for them to play!!!  Oh!  The unfinished puzzle at the top will be assembled once all the pieces I gave to friends come back to me.  It will be a wonderful colourful reminder of my friends far away from me..

This is the view from my work station.  Printer and office supplies are on the shelves on my right and the computer monitor can be used for TV input too!  I frequently watch/listen to cartoons while creating :)  That little room off the left is our storage room.  We have my deep freezer, overstock pantry and extra kitchen things not as frequently used in there.

OK!  Here are the shelves I showed you yesterday, more filled up!  Along the window wall is stamps, dies and all the tools I would need to create in journals and cards... markers, paints, punches, powders, ephemera, you get the idea...  On the other wall is paper. Well, paper and ephemera of all kinds sorted by colour and theme.  Each in its own labeled box.  I learned a while ago that open storage for me is not good.  A strong possibility of tipping over or something falling into it to wreck it was enough to make me invest in closed containers.  The only open containers are along the top and contain items to be donated, put away or currently working on.  The magazines and books are all stored in those wooden Ikea magazine holders.


And to the left of my work station is this little wall I have stored my ink pads (all labelled now!).  The shelved are Ikea bathroom cabinets without the doors.  I have all my reinkers and pads from SU!, StazOn, Distress Inks, Versafine and Brilliance.  My lateral filing cabinet holds solid coloured paper in 12x12 on the top and 8.5x11 on the bottom.  The white storage cubes are from Michaels.  They have some pads of paper from Heartfelt Creations and others, my envelopes of all sizes, card fronts, postage supplies and cutters.  The little room to the right is a utility room, now nicely closed off. 
AS I mentioned yesterday, this is the base of the room.  I had every intention of decorating and finishing the unpacking before now, but got hit with something 3 weeks ago and still leaves me with little energy.  I'll be sure to show you the different decorating projects as I get time to do them...

Oh yes.... Blog candy....
Please leave a message for me on this blog entry and I will draw a name from the list next Friday to get this die set and some other goodies I can stuff in an envelope. No restrictions on where you live:)  Not much, but my thanks for visiting. If you so feel inclined, also enter your email at the right to receive an email each time I post a blog entry.  I do not post more than once or twice a week.  That way you wont miss one!  Hugs!

Thursday, July 14, 2016

Tomorrow's the day!!!

Hi!

I'm preparing for tomorrow's Where Women Create entry...

So excited about my new play area!  It's the first time I've been able to design it!  Since just building the walls, doors and electrical were enough, I was on a budget for the rest of the room, so I tried to re-use what I could from the previous house.  After painting the room one of my favourite hues, (thanks again mom and Jim!)  I set to work preparing the shelves. The paint colour is the darkest here called Nautical by Valspar.  I was aiming to match the tone of the Ikea rolling carts that so many people have bought and I splurged on when we decided to move Sault Ste. Marie. (NO IKEA!!!!)

The shelves are from Ikea and I strongly recommend them for holding those 12x12 storage cases Michaels sells!  You can assemble the shelves so that there is just the right space for them!  Any way, here I have Jim cutting  down the posts from approximately 68" to 55".  Due to the ledge all around the room, I decided to try and keep everything storage below that line and keep the above for decorating.  I then stained them white to brighten them up.  Boy I was NOT prepared for the amount of time it took to do that job!!!  SO many shelves!  But the final result is pretty , so it was worth it.  Then assembly.  Jim was shocked at how fast I assembled them...  I HAD had 2 months of planning of measuring, so I was gung ho to get them up!

Then I started to unpack and make sure all important pieces would fit...  I originally had plans for a cozy corner where I could crochet or digital scrapbook in, but my chair proved to be too poufy for this space.  So adjustments were made...  The floors are a light gray laminate from Lowes that matches the tone of the carpets in the rest of the basement.  Gotta think future resale, right?
Come by tomorrow for the reveal of my new space.  Gotta warn you though, just the bones are done.  I've been sick for the past few weeks so not much finishing has been done.  I have time to do that part later this year! 
Oh!  Yes!  Tomorrow's visitors will also be entered to win a set of paper cutting dies if they leave a comment on this blog... details tomorrow!  Hugs!

Tuesday, July 5, 2016

Mojo Monday 455

Hi!

Thought I'd show you my first attempt of this challenge anyway...

Used the Travel background from PSX K-3219 stamped onto some paper from Elizabeth Craft Design's Through the Lens papers.  This one is from the Stone collection.  The ribbon I found at a re-use centre years ago and hesitated using... Gotta use up all these bits and bobs!  The photo negative along the bottom is something I picked up from a photographer artist during the yearly art fest.  Again, years ago.  And the circle of paper is some brown velvet from my stash.  MIGHT be K & Co.
All on a kraft card base.


Hugs!
Cindy :)

Card Making!

Hello!

Decided to play in my cooler basement today as it has been HOT outside here in Sault Ste. Marie! 

On a cooler walk a couple weeks ago I picked up some grasses and wild flowers with the idea of pressing them and making them into a card.  This is the result.  Not overly flashy but local :)  The tags are by K & Co.  They are sticky backed and yellowed a bit with age, but I still like the effect.  The background is the packaging and the Thank You slider is from Pebbles Ink - I Kandee.  Trying to use up my supplies... 


The second card is actually the second attempt at this week's Mojo Monday sketch.  I picked up a fat quarter which had these ladies printed on them and thought they'd be perfect for cards!  Other papers and the thank you stamp from Digital Princess Designs made a quick and simple card.


Hugs!
Cindy :)

Tuesday, June 28, 2016

A Thank You Card

Hello all!

I've got a thank you card to share this time.
Every couple years I get courageous to arrange a Different Point of View swap on OSA (a yahoo group called Oriental Stamp Artists).  To encourage participation I select a stamp from one of the vendors that are part of the group and try to make it an image that could be used in different ways. This is a two fold swap.  First they do get a card for sending in a card.  Second, I ask them to send me a second card for submission to a magazine.  I have had two of these swaps published in the past and love to see the result!
I just completed this year's attempt with an image from Art Neko/ About Art Accents called 'Koi with Stylized Wave'

I am horrible at sending thank you cards when well deserved, and I make cards!!!  I decided to try and change this bad habit and created one for the owner of the company.  She allowed me (as most stamp companies do) to use her image in a publishing attempt, but also gave me permission to send stamped images to those who may wish to play along, but do not have the funds to purchase the stamp. Most companies do not allow that. 
Since I have sent the cards off to possibly be published I cannot share those, but I can share the thank you card I created today.

I used two kinds of oriental washi paper in the background, some shimmer cardstock from DCWV and some handmade marbled paper I had in my stash to stamp and cut out the flowers.  I cannot remember where the cherry blossom stamps came from, but I love the versatility.  I also used the largest of the Labels 4 from Spellbinders for the opening and the Spellbinders Layered flowers in the bottom left cluster.

Hugs to all!
Cindy

Thursday, June 23, 2016

Puppy Cards

Hello!

Feeling like crap today so I focused on finishing some cards for the Shetland Sheepdog Fanciers Club in Edmonton, Alberta.  I've been a member for a few years and have been making cards for silent auctions and special occasions for a while too. 

This batch is for some competitions the club is hosting next month and the Sheltie Extravaganza in October. The October show is the Canada-wide competition. They hire judges and pay for their accommodations, but a thank you is always given as well.  I have made these cards to be given as part of the gift to the judges.


The supplies used are:
Adorn It Hound Dog Papers
Dog napkins by DTSC Imports
Very Vanilla Cardstock
Paw printed twill ribbon by www.hakidd.com
Quote stamp by SU!
Derwent Coloursoft pencils

Also used this week's Mojo Monday sketch

Hope you like it!

Cindy :)

Sunday, June 19, 2016

Where Bloggers Create!

Hi!
I am so over the moon that Karen has decided to host another Where Bloggers Create day this year!We have just moved cross country and I am building up a brand new craft room that I am looking forward to sharing...  I have gotten so many ideas from previous years' posts! I have lurked to some blogs that are dear to me and even made a shy request of comment once in a while...  All these regular creative bloggers remind me to play and get me motivated to play! 

If you have a blog and have a dedicated corner that you play in, join the fun!  On July 15th there will be quite a few of us posting and hopefully gaining some followers too! There is a poster on the side bar that if you click on it, will bring you to Karen's page with the details of this event.

I have already posted the beginning of the renovation for my space here.  And here's a sneak peak of what I have been doing... the rest will be revealed then!


Hugs!
Cindy :)

St. Patrick's Day and International Quilting Day!

 Woohoo! Time for some green Quilts! LOL! Not often that these two days land on the same weekend. I finally finished one of my UFOs (unfinis...