Translate

Thursday, October 31, 2013

Happy Halloween!

Hope you and your mini Halloweeners are having fun!
Here is one last project I did this year for Halloween:
I was lucky enough to have it published in the Vamp Stamp News E-Article Gelatos, Gel Sticks and Stamps
This is close up of the process of rubbing the gellatos onto an embossed surface:
 
You basically just rub the sticks across the raised surface then use either a blending stick (or I prefer my finger) to combine the different colours.
 
Have a great day!

Saturday, October 26, 2013

Boo!

Halloween is coming!!!!

I love Halloween!  I love to dress up and see kids all dressed up.  Too bad here in Edmonton, Halloween is usually accompanied by cold weather and sometimes even snow! 

I stamped the basic alphabet blanks for these cards years ago and then promptly 'lost' them in my stash of projects 'to do' :)  I refound them and decided to finish them off.  The big alphabet is retired from Stampin' Up!  The cards are all 6x 17" cardstock folded into 3. 


The 'Blood Card' was rubbed all over with Distress Inks (Barn Door & Vintage Photo) and a sponge.  Then I stamped the blood drips (Martha Stewart) in red all across the panels.  I used Basic Black and SU! markers to colour in the stamps.  Left to right the stamps are as follows:  Dangling Spider (Martha Stewart), Pumpkin (We Are Memory Keepers), round web (Inkadinkadoo), Trick or Treat (Inkadinkadoo) and the Spider (Inkadinkadoo).


The bright card was rubbed over with sponges and Distress Inks (Ripe Persimmon, Seedless Preserves, Mowed Lawn)  I then stuck with Basic Black to stamp the following:  Corner Web (SU!), Small cat (SU!), Round Webs (Inkadinkadoo), Swirl cat (Inque Boutique), Word Cat (SU!), October (Hero Arts).

And this Spider card was rubbed over with SU! Basic Black and Momento Black.  The winding spiders are by Inkadinkadoo and stamped in Basic Black.  The other stamps were stamped in Brilliance Black Ink: Spider Swirl (Inkadinkadoo), Mummy cat (Magenta), Hanging Spider (Inkadinkadoo), Mummy (Craft Smart), Flying Witch (Inkadinkadoo), Coloured Witch (SU!), Ghouls Greeting (Craft Smart).

Thursday, October 24, 2013

Everything Christmas!

Hello!

Priyanka at My Heart Pieces challenged us to come up with a project for Christmas this week.  Hard to do with Halloween a week away, but here's what I came up with...

I used Tim Holtz's large tag as a template for this project.  Then I traced it onto old Karen Foster December Doodle paper, cutting it out with deckle scissors.  I edged the base with red ink, then placed the patterned paper over top.  Wide Recollections Washi tape was wrapped twice at the bottom, then accented with some Christmas bias tape at the edge.  I printed out the 'Party Time' image from My Heart Pieces and coloured it in with Prismacolor pencils.  I fussy cut the image out and placed it on the tag.  Finishing it off is a Merry Christmas Page Pebble by Making Memories and a handful of different ribbons from my stash.
All ready to adorn a gift of a bottle at Christmas!

Monday, October 21, 2013

May Arts Halloween Challenge

Hello All!

In September, 20 people were offered a chance to create something special using some of May Arts newest ribbon!  I was chosen with my idea of making a mini spiral book to be used for pictures or for journaling. :) Check it out: 

I started with 2 pieces of 5x8" grunge board by Tim Holtz.  I trimmed both sides to give it a dress shape.  It has a spiral pattern embossed on it so I rubbed Ripe Persimmon Distress Ink over both sides of the covers.  To add some depth and interest, I used a black sharpie to trace some of the design on the front and back.  I used some of the Black Satin ribbon, folded in half lengthwise and adhered to a 2" glue dot to make a flower.  The center of the flower is a bat charm from Tim Holtz Adornments. 
Along the bottom of both covers I used double sided tape to wrap the Orange Ribbon with Black Pom Poms.  Then another row of tape.  This time I gathered the spider ribbon to create a ruffle.  To finish it off, I wrapped the Black Twine over the ruffle a few times and tied it in a knot.  
I used the cover to create a 5x6.5" template to cut out orange pages out of cardstock.  The Bind It All was used with a 1/2" coil to punch and connect everything together.  
Of course I had some ribbon left over so I created a couple more items...

Most of the left over Black Satin ribbon was wrapped around a 5x6.5" card.  A strip of the orange/pom-pom ribbon across the center, then a strip of the Spider Ribbon above that.  I covered a 3.5x4.5" piece of orange cardstock with torn purple mulberry paper.  I stamped the image by Inkadinkado with black ink, then purple Encore ink and embossed with Kaleidoscope embossing powder.   On the bottom right, a scrap piece of the grunge board was coloured with Seedless Preserves Distress Ink, swirls traced with a white then orange sharpie. An owl charm from Tim Holtz Adornments was attached with glue dots.  I tied a small strip of the Black Satin ribbon in a knot and attached it to the top left for accent. 
The last item is an award ribbon for Halloween!  Start with a 2.25x5.5" orange card for a base.  Adhere a 2" glue dot center top and gather the spider ribbon around the edge.  Spray the left over pieces of grunge board with Fully Purple Tattered Angels Glimmer Mist.  Trim and make a flower-like center to the spider ribbon.  Finish off the center with another charm from Tim Holtz Adornments.  I folded a strip of the Orange/Pom-Pom ribbon under the center charm.  It was finished off with a pin on the back with scrap cardstock and glue dots. 
 

Sunday, October 20, 2013

Sympathy

Hello!

Sympathy cards are cards I take very seriously.  In 2009 our family had a horrible year with the loss of two parents and our 12 year old dog.  I took great comfort in receiving a note and or a card from my online friends.  Don't get me wrong!  Family and close friends were there for us too, but these ladies who only know me by my online presence touched me with the effort they made to create and send me a card.  3 such friends recently experienced a loss and I needed to create some cards.  I created a couple extra to have on hand next time.   When I create sympathy cards, I am constantly thinking of these and other friends/family who have lost someone.  These are truly works of love.  Peace to all who have had to go through this life changing event. 

This card is 5x6.5". I cut a 4.5x6" piece of Stampin' Up paper, covered with a 4x5.25" piece of SU! paper from the same set. 
I stamped this little Asian girl (cannot remember where she is from!)  onto Sizzix peach paper, then masked her as I stamped the text stamp by Stamp Magick over top.  Stampin' Up markers were used to colour her in, then I used my tearing ruler to rip the edges and rubbed them against a red ink pad.  I placed this collaged image on the matted card. 
Red crocheted trim down the left and a button brad finish off the card. 

Friday, October 18, 2013

Think Pink!

Hi there!

I am not a pink person in general, but love to play with the colour when doing special projects like this!  As Lisa from Digi Darla said:
These days it is getting harder and harder to find someone who hasn't been touched by cancer.  It is breast cancer awareness month and it is the perfect opportunity to create a card letting someone know we are thinking about them.  The card doesn't specifically have to be for someone dealing with cancer, it could just be for someone that is dealing with some sort of difficulty, or a project that lets someone you care about, know that you are thinking of them.  However, in honour of breast cancer awareness month, we do ask that you include lots of pink on your creation.

This week's challenge is to use as much pink as possible, and I do LOVE a challenge!  So here's my 6x8"card:
I started with Digi Darla's two images, 'Fairy Love' and 'Miracles Are Everywhere'.  I printed 2 3.5x5" of the Fairy and 2x3" of the saying.  Prismacolour pencils were used to colour both images and the hand/heart of the second fairy.  I used Labels 22 to cut out the fairy and then Decorative Labels 22 to cut out the mat out of a scrap of pink card.  A hand cut second mat was done out of a lighter pink card.  I placed this onto an old printed cardstock piece from my stash.  I believe it is from Die Cuts With A View.  I cut apart the greeting then reassembled it overlapping the matted image. 

The card is an 8x12" piece of pink Bazzil cardstock folded in half.  Then placed a 5.5x7.25" piece of Think Pink paper by Me & My Big Ideas.  A strip of SU! Purely Pomegranate satin ribbon was wrapped around the card front, then the layered panel on top of that.  A strip of flower ribbon was placed across the front to add more detail.  As a finishing touch I cut out the heart and hand from the second fairy image and pop-dotted it over the original, then added stickles (Cotton Candy) to her wings and (Magenta) to the flowers in her hair.
Enjoy and challenge yourself to create something pink!  Hugs!

Thursday, October 10, 2013

Anything Goes!

Hello!

At My Heart Pieces this week we have an easy challenge: Anything Goes!  I have been admiring the image of "Pretty Noyontara" for a while and decided to play with her. 

Since she is dressed up as a mythical creature, I went all out and used fun colours to depict her.  I also used a technique called 'Spotlighting' where you only colour in part of the image. I printed two copies of the image 3.5x5" on white cardstock. Labels 20 from Spellbinders was used to cut out both the spotlighted part and the entire image.  Prismacolor pencils were used to colour in the spotlight.  Once coloured I pop dotted the smaller image on the larger, matching up the image.  Then I hand cut two mats for the image with papers I created using my Gelli Plate.  The card is 5x6.5" covered with another Gellied paper.  I layered Glittery purple ribbon on top of gold accented 1" cut our ribbon, then on some Michaels sheer purple ribbon.  I placed the border on the left side of the card front, then placed the matted image centered.  Final touch was a circle stamp from the set 'Magical Mini Letter Seals' by Whimsey Stamps,  I stamped and matted this with scraps from the handmade paper.  I punched the greeting with Family Treasure's 1 1/4" circle punch and the mat with Punch Bunch's 1.5" circle punch. 
Until next time!

Monday, October 7, 2013

Using up personal stock

Hello!

I am finally able to post after being out for a week with a cold/flu!  Hope you all are all keeping healthy. 

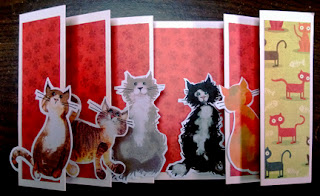
I bought a couple kits a few years ago from Moveable Parts.  I never did get to assembling them.  Last month I finally did.  My sister's birthday was coming up and she is very much a kitty person.  She also turned the big 4 0 !  I am not famous for following instructions at the best of times, since as soon as I see what we are doing, I tend to tweek it a bit to see what happens.  So here are the results of my purchased kit: Pack of Cats.

Card one is my sister's 40th card.  The left side is accordion folded and a kitty has been placed on each fold.  I made the card fold over from the right, making it backwards from normal, but I like this quirk!  On the folding side I only adhered the kitty paper top, bottom and left side, making a pocket to insert a gift card.  The score lines were made at 2"/2"/2"/2"/2"/2"/2"/5"/5".  Then I folded the top corner at the end.  I used paper from We Are Memory Keepers called Friends Furever.  The HB stamp is by Stampin' Up!  The inside words I created using the Dial-Up A Word Band Stamp DUS300

 
The second card was folded as per instructions, sort of, and the rest of the kitties added in the accordion folds as required.  Same paper used to embellish the card.
The score lines were 1 3/4",1 3/4",2 1/2",1 1/2",2 1/2",2",6",2",2 1/2",1 3/4",1 3/4"


No my usual work, but quick and fun!

St. Patrick's Day and International Quilting Day!

 Woohoo! Time for some green Quilts! LOL! Not often that these two days land on the same weekend. I finally finished one of my UFOs (unfinis...