Translate

Thursday, September 26, 2013

Happy Halloween!

Hi there!

This week at My Heart Pieces the challenge is Halloween!  As we all dress up at Halloween I thought I'd use Priyanka's "Jungle Queen" image for this challenge.  I think I might make myself a costume along these lines!  Both these images were printed to 4x6" size onto white cardstock on my Laser Jet Printer. 

This first card was coloured with my Prismacolor pencils.  I find I am beginning to like these more and more...  Once coloured I used the Spellbinders Labels 28 to cut it out.  I matted her onto Graphic 45 Steampunk Spells paper and hand cut the mat.  Then repeated the process onto black shiny packaging.  I used a piece of felt and a black ink pad to dry rub some black along the edges for a more grungy look.  I also added a gold hat charm that happen to fit her perfectly!  I used a black Sharpie to colour in the hat.
 
The card is 5.5 x 8.5".  I placed some Darice Steampunk Washi tape down the side of a 5.25 x 8.25" piece of Fanciful Floral paper (same line as above) then adhered the matted Jungle Queen.    The ribbon is from Michaels and the Mini Gears are from Tim Holtz.  I am liking this Steampunk thing!
 
Card #2 is more of a general card.  I loved the idea of 'Jungle' and so tried to make her truly jungle-like.  I coloured her in with my watercolour crayons and water pen then cut her out with Spellbinders Labels 20.  This time I did not use the largest size so I was able to cut the appropriate mat out of Karen Foster 'Spots' paper.  I edged both layers with a black marker. 
 
This card is 4x8" made from an 8x8" piece of printed cardstock in my stash.  I wrapped the front with 1.5" ribbon from Michaels then placed the matted queen on top.  I found that one piece of vellum showed through too much so cut out a second one then secured them with the EK Success Fastenaters.  The greeting is one from a set I've had for a while but not used!  the Word Art Stamps v.1 by Autumn Leaves. 


Tuesday, September 24, 2013

Heartfelt Creations Application


Hello!
Last week I applied to become a Design team member for Heartfelt Creations.  I love these stamps especially since quite a few of them come with matching dies which makes it easy to cut out!  I started with HCPC 3325 Daisy Bouquet and the HCPC 3318 Daisy Patch Flowers and stamped off a few of each on white cardstock.  I used my Prismacolors pencils to colour in the flowers then the matching die set HCD 703 Daisy Patch to cut out the individual flowers. 


I used the second bouquet to create a mask in order to spray the background.  I used Forest Green Tattered Angels Glimmer Mist and Lindy's Stamp Gang Moon Shadow Mist - Treasure Island Turquoise.  I took a 5.25x7" piece of brown Mulberry paper and cut out the largest Labels 20 die to make a mat. Then pop dotted a 5.5x7" yellow embossed oval mat over that.  Green Maya Arts lace ribbon was adhered around the edge of the card and I made a bow of unknown ribbon and Maya Arts Mini Rik Rak to place in the top corner.
 

I used Irredescent vellum to cut our some flowery corners to accent top and bottom of the matted flowers (Cherry Lynn DL161 Lace Corner Deco A) and left over paper to cut out the quote panel (Spellbinders Fancy Labels).  Both were coloured in with my Bic markers.  The quote is by Stampin' Up. 


 I am trying to finish off the inside of the cards as well lately, and so I used scraps and leftovers to decorate the inside.

Friday, September 20, 2013

Happy Anniversary My Love

Hello!

It is our 19th Anniversary today.  19 years ago, we had eloped and made our way to Florida from Edmonton, Alberta, Canada.  No we were not running away, but trying to save some money and meet as much of our family as possible.  In the end we spent the same amount on this wedding/honeymoon as we would have on a one day event in a church and dinner.  After 1 week in Walt Disney World, we spent 2 weeks in Ontario and Quebec meeting each others' extended family.  Here is our official wedding photo so long ago!

For his anniversary card, I wanted to remind him of our time in the Disney parks.  I had found this button that played "It's a Small World" a while ago and wanted to incorporate it in the card. 
 
So I collected some papers and some cork to create an extra high pop up bar to accommodate the musical button.  The map is something torn from a magazine a while ago.
 
 
I went through my stamps, both traditional and digital to find as many different world wide characters I had.  I ended up with:
MacKenzie by Sugar Nellie
Ukrainian Doll by Studio G
Canadians by High Hopes
Japanese Doll by Hero Arts
Rajrupa by My Heart Pieces
Lil' Indian Harvest by Digi Darla
 
I stamped and printed them all on white paper then coloured them in with my watercolour crayons and water pen, accented by markers.  Fussy cutting them was a bit of a challenge, then I overlapped them trying to make up for different sizes by depth of field. 
 
I covered the 5.5x5.5" map panel with a same size printed vellum in order to reduce the brightness of the map but still show it.  Once the different characters were added, I placed the music button behind the Canadian. (We ARE Canadian after all!) Then I placed the cork supports as well.  This was all placed on the yellow 6x6" folded card front.  I finished off the card with some green Candi pop ups on three corners. 
 
Now I got to go get ready for dinner out.  Thanks for joining us on our special day!
 
Oh!  And I am entering this card with the 'It's a Small World" challenge at Quirky Crafts.


Thursday, September 19, 2013

Shimmery Christmas Card

Hi!

I've been working on cards for another design team application this week in between starting my first week back at work.  Whew!

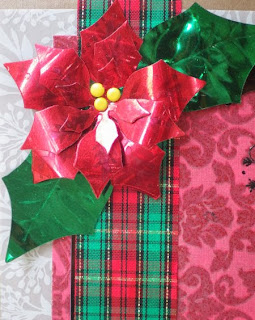
This is something I've been wanting to try and so I did!  Elizabeth Craft Designs has these Shimmer sheets that look quite luxurious!  I was wondering what would happen if I tried cutting out some shapes with it.  So I used the Shapeabilities Layered Poinsettias and cut out the flower petals with the red metallic and the leaves with the green metallic sheets.  I did not get the embossing on the cut outs, so I used Bic markers to add some vein details on the leaves and petals.  I also tried cutting out a frame with dark copper metallic shimmer sheet. 

I took a 4 3/4x  5 1/2" piece of DCWV Embossed Glitter cardstock, stamped and embossed a Stampin' Up! reindeer stamp then placed the die cut frame around it.  I placed this onto a 5.5x 7" pieces of Magenta printed vellum, then onto the finished 5 3/4x 7 1/4" card.

I placed a recycled piece of ribbon down the left side of the card, then assembled my shimmery poinsettia!  The finishing touch is a 'Joy' fabric label I've had in my stash for quite a while...

Friday, September 13, 2013

More Beads, Glitter and Lace!

Howdy!

As mentioned yesterday, I created these two extra items with the same 'Artist Ankhi' image from My Heart Pieces.  She is too cute and who among us is NOT an artist? We may use fabric or paper or metal instead of paint, but we are all artists!  I printed the images for both these cards at 4x6".

The frilly card is finished 5x6.5".  I started by trimming the image to center on a die cut frame from Spellbinders Romantic Rectangles.  I glued white cotton lace around the fame with the help of double sided tape on the back.  To ensure the lace would not wander, I placed a sparkly brad in each corner and put the brads though a swirly green cardstock I got from an old scrapbook company catalog, also cut to 5x6.5".

 
I then coloured the image with my Stampin' Up! markers, trying to add blending as much as possible.  I added the two crocheted flowers (Recollections) to the front panel with a larger sparkly brad, then adhered the panel to the front of a white card (5x6.5")


Card number two had to be a little more dimensional... an Easel Card is dimensional!
I did the same trick of cutting out the image, only with Labels 28, then matting it to two different cardstocks before colouring it.  PLEASE NOTE!  Do NOT do this if you are going to colour using pencils!  The pencils picked up the slight texture and edge of the tape behind the image. By then the card was done and just needed assembly.  So I did not redo her.   

The finished card measures 6x7".  I wrapped a red card panel with beige eyelet fabric.  The image was adhered, then beige sheer ribbon, pink textured ribbon and rose flower ribbon.  Added the silk flowers and pearl bead to bottom right corner to balance the big bow in the top left.  Adhered this panel to the front of an easel card.  Inside, I placed a 6x7" piece of heart rose vellum along with the same pink textures ribbon and silk flowers.  The finishing touch was a 2.5x3.5 red card wrapped with the same beige fabric, accented by two roses from the cover ribbon.  An appropriate greeting will be added when I go to use the card... AFTER I redo the image! :)

Thursday, September 12, 2013

Beads, Glitter and Lace!

Hello!

Time for another My Heart Pieces Challenge!
I chose to use one of Priyanka's newest images 'Artist Ankhi' for this challenge of Beads, Glitter and Lace.  I'm also trying out my different colouring mediums for this challenge.

My first thought was to make a little book for someone to keep their thoughts in, or photographs or even an autograph book if they like!  I started with two embossed pieces of Tim Holtz Grungeboard and rubbed Distress ink all over the fronts and backs (Pickled Raspberry and Seedless Preserves).  I printed out the image to 5x7" and coloured it in with my go to technique of watercolour crayons and a water brush.  I cut it out with the Spellbinders Labels 23, then hand cut matted it with a shimmer red cardstock.  I used the Fleur De Lis Accents border to cut out the first part of the front border and added a strip of white cotton lace and pink ribbon to add some frill.

 
The butterfly is both parts of the Spellbinders Les Papillion Two.  Bottom is the same pink cardstock as the Fleur De Lis border and the top is a silvery paper scrap I found on my desk.  I used my water pen to add some colour into some of the wings for depth.  Finished off the front with carefully placed half-pearls and a few heart pins.  
The pages inside are pieces of paper I found in my stash, all cut to the same size of the book (5x8"), then punched with various corner and/or border punches.  Oh yes!  I used the Bind It All system to create the book!  Now to find someone who would like it...
Come back tomorrow for two more cards made with this image!  Hugs!


Monday, September 9, 2013

New Published cards!

Hello!
I love challenges and entering cards for publication.  You never know what exactly it is the publisher is looking for outside the theme, so there is no guarantee your card will be published.  As it is said though... You cannot be published if you do not submit!  So give it a try!  Most publishers will hold cards for future publications and forward any cards they cannot use to non profit organizations for use by people there.  Since this is the policy, I do not feel my attempts are a waste of time.  Even if not selected, the publisher staff will see them and also people who need a pick-me-up will see and enjoy them!

I've been lucky enough to have a few more cards published by Vamp Stamp News (eArticle on Gellatos and Gel Sticks) and Scrap & Stamp.  Check out my Published Cards page to see what was picked!

Hugs!

St. Patrick's Day and International Quilting Day!

 Woohoo! Time for some green Quilts! LOL! Not often that these two days land on the same weekend. I finally finished one of my UFOs (unfinis...